
Chromebooks are generally light, portable laptops that use the Linux-based Chrome Operating System, rather than Windows. Instead of storing programs and files on a hard disk, they connect to the internet using the Google Chrome browser and run apps that can be accessed through the Chrome Store.
Chromebooks, made by a number of companies, including Acer, Samsung, HP and Google, are becoming more popular in schools as they are:
Disadvantages include the need to use unfamiliar apps and issues with connecting to the internet, in some cases with regard to security.
How easy are they to use for people with disabilities? Is it possible to connect alternative keyboards, mice, etc.? What about using speech recognition, switch access or eye gaze? Chromebooks have built-in accessibility options that can be adjusted to suit individual needs and have USB ports that allow a variety of assistive devices to be connected. Overall, the accessibility options are pretty good, though there won't be a solution for everybody - some needs will be better met by using a Windows laptop.
In addition to the built-in features of Chrome OS, the Chromebook can use Apps and Extensions to enhance access. Apps are individual, web-based programs and activities, while Extensions provide enhancements to Chrome OS working across a range of web pages and apps, in the same way that extensions add functionality to some other web browsers.
Craig's poster on Chromebook Accessibility and Learning Tools
Google Guardian's Guide to Tools for Children with Disabilities during Distance Learning
Once you have signed in:
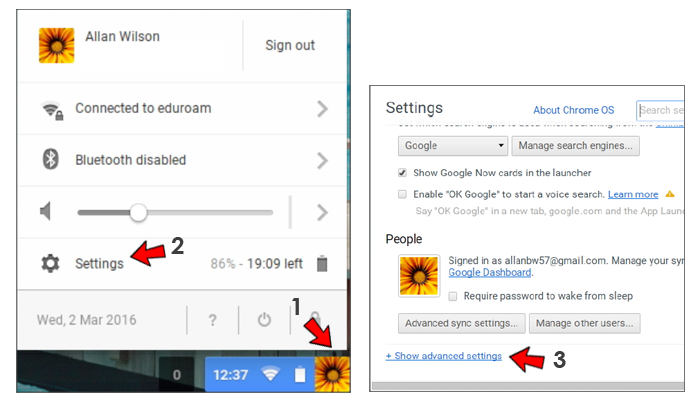
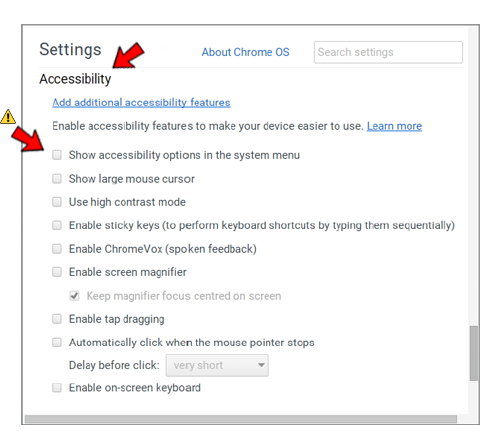
Now scroll down to near the bottom of the window until you see the options available under Accessibility.
If you select Show accessibility options in the system menu,
you will be able to see Accessibility in future by just clicking on your profile picture.
Selecting this option provides a mouse pointer approximately three times the size of the standard pointer.
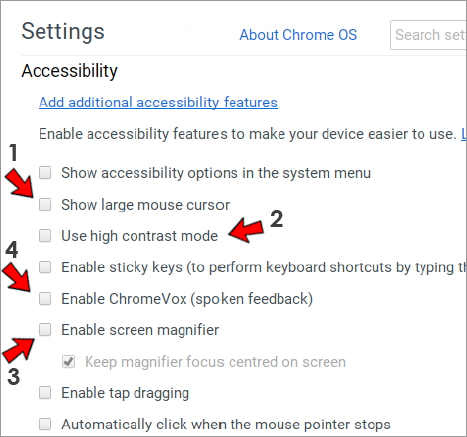
This converts black text on a white background into white text on a black background. Note that images will be shown in 'negative'. There are no more sophisticated options, e.g. use of yellow text on a black background.
Selecting this option provides 2 x magnification of the whole screen, with an option to 'Keep magnifier focus on centre of the screen'.
The ChromeVox screen reader can be toggled on and off by pressing Ctrl-Alt-Z. ChromeVox, like most screenreaders, relies heavily on the use of modifier keys. The main modifier combination for ChromeVox on the Chromebook is Search + Shift, usually referred to as the ChromeVox key. Different key combinations work as the ChromeVox key in Windows (Ctrl + Alt) and macOS (Ctrl + Cmnd). Note that the keyboard layout of the Chromebook is significantly different from other platforms (see below), with Function keys replaced by Shortcut keys and other differences, such as the introduction of a Search key.
ChromeVox is less comprehensive than some screenreaders, such as Jaws for Windows, but it can meet the basic needs of most blind users. One disadvantage is that most navigation keys require two separate keystrokes, which can double the keystrokes required for a task compared with Jaws.
There is a complete list of ChromeVox Keyboard Shortcuts and an Interactive Tutorial for using ChromeVox on the ChromeVox website.
Finally, there is a very useful review written by a blind user of ChromeVox running on a Chromebook.
Several Accessibility Features can help people with a physical disability who find it hard to use the standard keyboard and touchpad / mouse settings.
This allows the user to perform keyboard shortcuts by typing keys sequentially. For example, the keyboard shortcut to take a screenshot of a portion of the screen is to simultaneously hold Ctrl + Shift + Shortcut Key 6. With Sticky Keys enabled you can press on each key in turn. A small window appears in the top left of the screen to show which keys have been pressed.
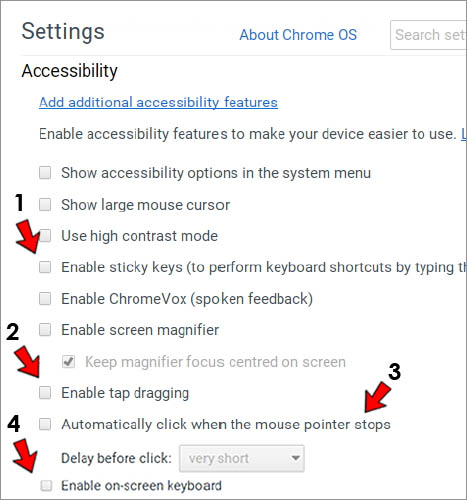
This is the equivalent of the 'click and drag' feature in Windows, allowing an object to be moved around on the screen by clicking on it and then moving on the screen by tracing a finger across the touchpad once this option has been selected.
This is the equivalent of a 'dwell click' in Windows, allowing an object to be selected by holding the mouse pointer over it. There are five different timing options, but even the 'very long' interval is quite short - about a second.
The on-screen keyboard is pretty basic, but allows access to the built-in speech recognition system. Some Chromebooks have touch screens which can take better advantage of an onscreen keyboard. (See also under 'Supporting People with Reading and Writing Difficulties', below)
In addition to the Accessibility Features described above, some of the functions available under the Device heading in Settings can be useful for people with physical disabilities. Touchpad speed can be adjusted, making it easier to move the pointer on the screen. Keyboard Settings allow auto-repeat to be adjusted either for people who find it hard to lift their finger from a key, or who have a tremor.
Most Chromebooks have USB ports or Bluetooth connectivity, which allow alternative keyboards / mice / trackballs / etc. to be connected, provided that they do not require additional software drivers to operate. Some switch interfaces, e.g. the Don Johnston Pro interfaces, can be used for connecting switches, provided that they use hardware to emulate key strokes. Switches can only be used with web sites that provide online activities for switch users, e.g. Helpkidzlearn.com and Senictsoftware.com.
For more information on using switches with a Chromebook
information on some more online switch activities
As far as we have been able to find out, it is not currently possible to use eye-gaze to control a Chromebook.
The speech recognition facility accessed through the on-screen keyboard is pretty decent for writing, though not up to the standard of recent versions of Dragon NaturallySpeaking for Windows. The Chromebook will automatically detect and use a USB microphone when it is plugged in. The on-screen keyboard also has a word prediction feature which appears intermittently and disappears from the screen so quickly that it is often impossible to select a word from the screen.

Support for reading in the Accessibility Features is very limited. There are no facilities for changing text and background colours and ChromeVox is of limited value in providing text-tospeech support for a person with dyslexia. Fortunately, there are extensions that can be used to provide text-to-speech and other support for people with reading difficulties. SpeakIt gives basic text-to-speech support, while Texthelp's Read&Write and Co:Writer, along with Snap&Read, from Don Johnston provide much more comprehensive support for people with dyslexia and other reading and writing difficulties.
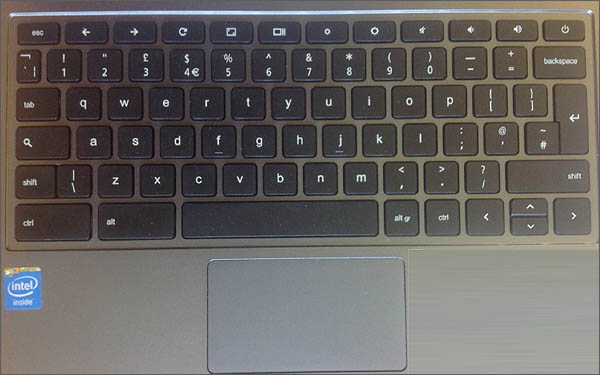
The Chromebook keyboard is significantly different from those associated with Windows and Mac OS computers, most notably with the use of a row of Shortcut keys to replace Function keys and the introduction of a Search key.
These are the functions assigned to the top row of Shortcut Keys:
When you are using a Chromebook, you can bring up a list of shortcuts by pressing Ctrl + Alt + ?.
Further reading on the keyboard:
More information on the keyboard layout
A comprehensive list of keyboard shortcuts
The first thing you'll notice when you look at the built-in touchpad is that, unlike Windows and Mac laptops, there are no buttons. This table shows how click on items and replicate other button functions with the touchpad.
| Function | How to do it with the touchpad |
|---|---|
| Move the pointer | Move one finger across the touchpad |
| Click | Press on the lower half of the touchpad, or tap on the touchpad |
| Right-click | Press the touchpad with two fingers, or hold the Alt key while clicking with one finger |
| Scroll | Move two fingers up or down to scroll vertically; move them left or right to scroll horizontally |
| Swipe | Move two fingers quickly to the left to go back on web pages; to the right to go forward |
| See open windows | Swipe down with three fingers |
| Swipe between tabs | Swipe quickly, left or right, with three fingers. |
| Drag and Drop | With one finger, click item you want to move. With second finger, move item. Release both fingers to drop item where you want it. |
More information about using the touchpad.
Remember, if you have difficulty using the touchpad, you can always plug in a USB mouse.
Once a month we'll send you an email with news, research and thoughts, as well as training courses and free webinars you may wish to attend.
Our social media sites - YouTube, Twitter and Facebook