 Newsletter: join thousands of other people
Once a month we'll send you an email with news, research and thoughts, as well as training courses and free webinars you may wish to attend.
Our websites:
Posted by Claire Harrison on the 19th August, 2024

3-D Printing technology has developed in leaps and bounds since the first printers were available on the commercial market in the early 2000s, and the Assistive Technology community has embraced the potential for creating reliable, cost-effective tools for people with additional support needs.
3D Printing allows you to create an object by building up layers of material that are extruded through a nozzle.
This page provides a useful summary as well as examples of the different objects that can be created with a 3D printer:
Whilst the schools were on their summer break in Scotland, I took advantage of the fantastic 'uCreate MakerSpace' here at the University of Edinburgh, with its array of 3D Printers and other technological wonders. After an induction and introduction, would I be able to successfully create useful 3D-printed objects that could support children and young people with complex learning needs? #SpoilerAlert—yes! The open-source nature of 3D Printing means there is a rich library of ready-made objects to choose from, meaning that you can readily produce 3-D printed Styli, Keyguards, Pencil Grips and more without the need to learn how to create 3D designs from scratch.
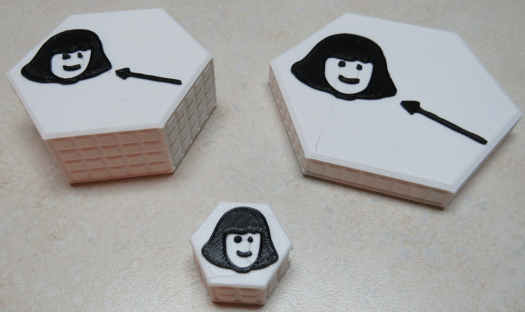
One of our CALL Scotland national resources is the' CALL Core Word Kit', a toolbox of assistive technology, communication supports, lesson plans, and resources. The kit includes a variety of printed communication boards—'Core Word Boards'—and the University of North Carolina Center for Literacy and Disability Studies has created a set of 3D-printable Core Words. The files for these are freely available to download from their website.
Having a physical set of communication symbols that represent Core Words poses interesting questions about how a learner with complex needs might interact with and learn to use such an object - something which we will begin to explore in more depth later this term. There is already a 'remix' of the symbols created by the fantastic 'Volkswitch' website, so there are many things to explore.

However, practically speaking, how easy is it to produce a set of 3D printed communication symbols?
Apart from access to a 3D printer with a supply of the filament that creates the print, you will need to be able to access some software that will prepare your item (this is called slicing) for Printing. There are free-to-download software options, e.g. Ultimaker Cura or Prusa.
And that's it. Once you have your file 'sliced' and ready to go, load it into the machine and watch it go. As a rough timescale, the original Project Core 3D symbols take around 1-1 ½ hours to print, but this will likely vary depending on your printer and the speed and quality of your print.
There are many practical applications for 3-D-printed materials that we can use with the learners we support at CALL Scotland. We intend to 3D print a set of Pencil Grips and Keyguards to add to our loan bank.
Do you know of a local secondary school with a 3D printer? Would they be willing to collaborate and provide some 3D prints for your provision?
If you want to learn more about 3D Printing, we will host a free 'Introduction to 3D Printing' webinar in early 2025. For the 2025 programme, keep an eye on our social media at Facebook, Instagram and Twitter/X or sign up for our monthly newsletter to get the latest information.
Once a month we'll send you an email with news, research and thoughts, as well as training courses and free webinars you may wish to attend.
Our social media sites - YouTube, Twitter and Facebook